Selection
Use the Selection panel to target specific areas of an image for precise edits. You can isolate individual regions or combine and overlap selections to create more complex adjustments.
When an image is loaded, the app automatically applies one of the below Default Selection options, based on the image content and your Preferences settings:
- All
- Subject
- Background
- Portrait
- Landscape
How to Edit a Selection
To access the Selection panel for non-generative enhancements:
(Denoise, Sharpen, Adjust Lighting, Balance Color)
- Click the enhancement in the right panel
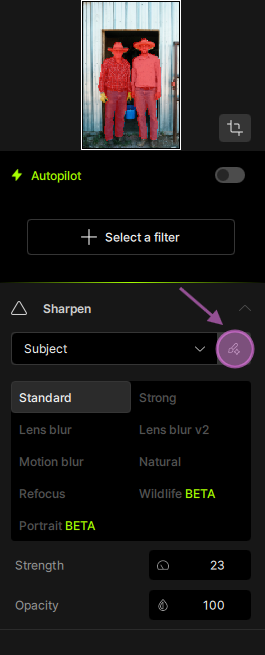
- Click the Edit Selection icon
Example: The Edit Selection icon is shown below in the Sharpen enhancement:
Generative enhancements use different selection panels:
- Recover Faces – see selection steps
- Super Focus – see selection steps
- Remove Tool – see selection steps
- Preserve Text – see selection steps
Selection Options
Once in the Selection panel, use the dropdown menu to switch between selection types

If instead of choosing a specific slection - you want to manually refine the current selection, use the Brush tool:
- Add (+) to include areas
- Remove (–) to exclude areas
- Then Click Save
- Use the Keyboard shorcuts to efficiently mask. Using the "X" key while masking will toggle between (+) and (-) to help quickly switch between those modes.
- Using the Spacebar will allow to pan/move in the file itself.
- All keyboard shortcuts will be in the Edit Menu > Mask, when you are in the Selection panel.
Example: adding here missing areas (gloves, bucket and boots) to the Sharpen selection using the (+) brush tool

Feathering
The Feathering slider softens the edges of the selection to create a smoother transition with surrounding areas.
- Lower values = sharper, harder edges
- Higher values = softer, more blended edges
The default value (100) is recommended for most cases, but can be adjusted depending on the image and desired result.
Brush Settings
- Regular Brush – Manually paint areas in or out of the selection
- Object Selection Brush – Automatically detects and selects entire objects
- Super-Pixel Brush – Quickly selects surrounding areas for faster masking
Brush Size
Use the slider or enter a specific pixel value to adjust brush size.
Add/Remove
Switch between Add (+) and Remove (-) to refine the mask as needed.
Preview Color
Adjust the overlay color to better visualize the selected area.
- Default color: Red (#FF0000)
- If your image contains red elements (e.g., a red car), switching to another color like blue can improve visibility
Preferences Settings
You can define a Default selection for each enhancement, and this selection will apply automatically to all newly imported images.
- Go to: Edit > Preferences (Windows) or Topaz Photo > Preferences (Mac)
- Select the enhancement
- Set the Default Selection to your preferred option
- Click Save
Example: Sharpen set to apply to "All" instead of "Subject"

Frequently Asked Questions
Q: "Why is the Subject selection not accurate?"
A: This usually happens when there is not enough contrast or detail between the subject and the background. To correct the selection, you can:
- Refine the selection manually using the Brush tools
- or Switch the selection to All to apply edits to the entire image. To apply this behavior by default on all imported files, see the steps in the "Preferences Settings" section.
Q: "Why is Mask greyed out in the Edit menu?"
A: The Edit > Mask option is only active when you are inside a Selection panel. If it appears greyed out, it means you are not currently editing a selection. Follow the steps above to access the Selection panel. Once inside, the Mask options and keyboard shortcuts will become available.