Editing Tutorials
Getting the best possible results in Topaz Photo starts with the right workflow. How your file reaches Topaz Photo, what other editing applications you use, and what the image actually needs can all affect the final result.
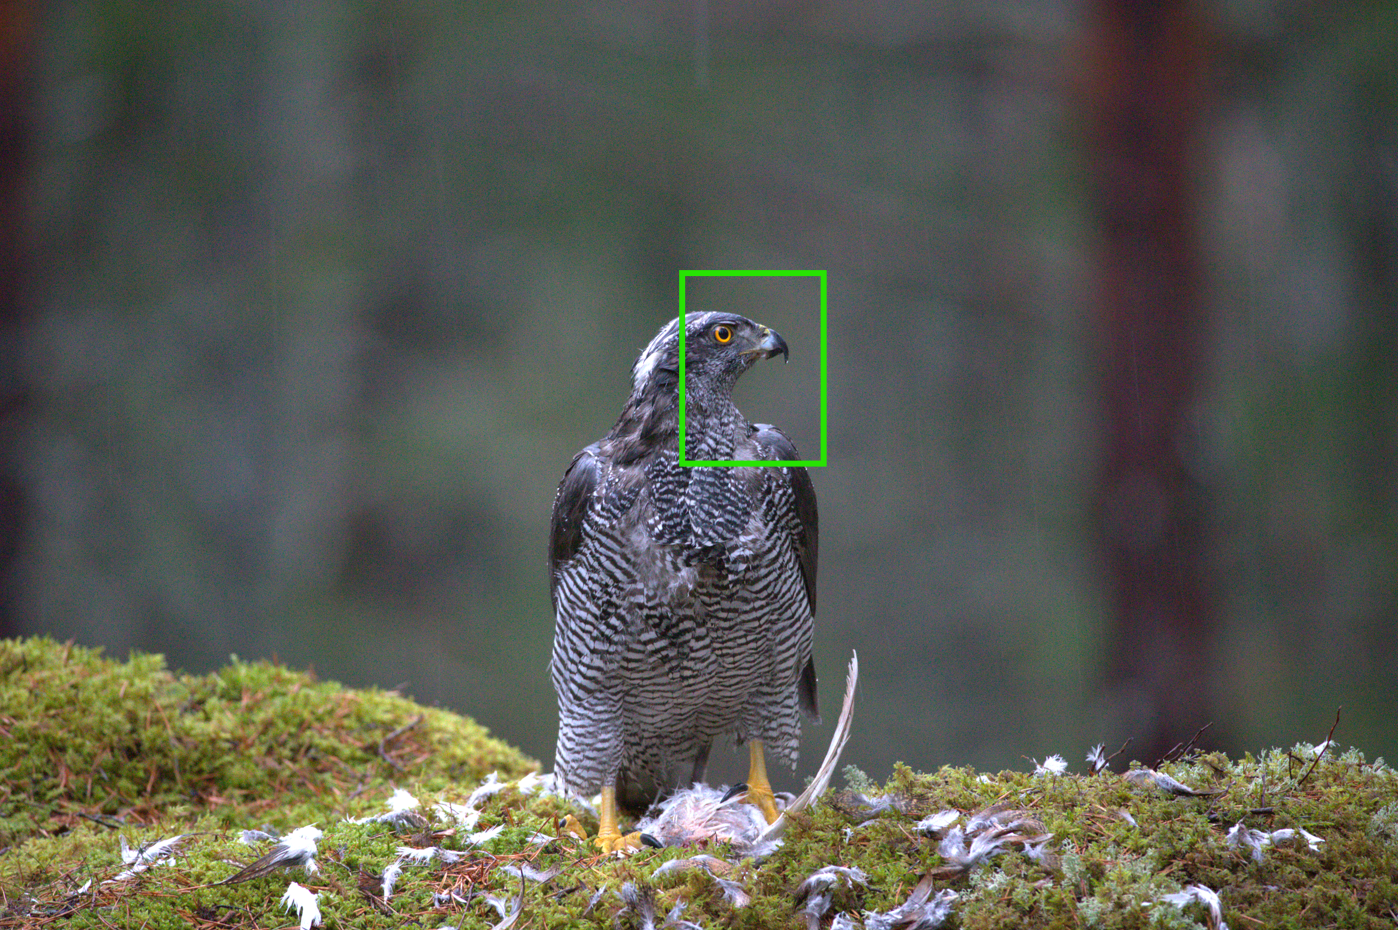
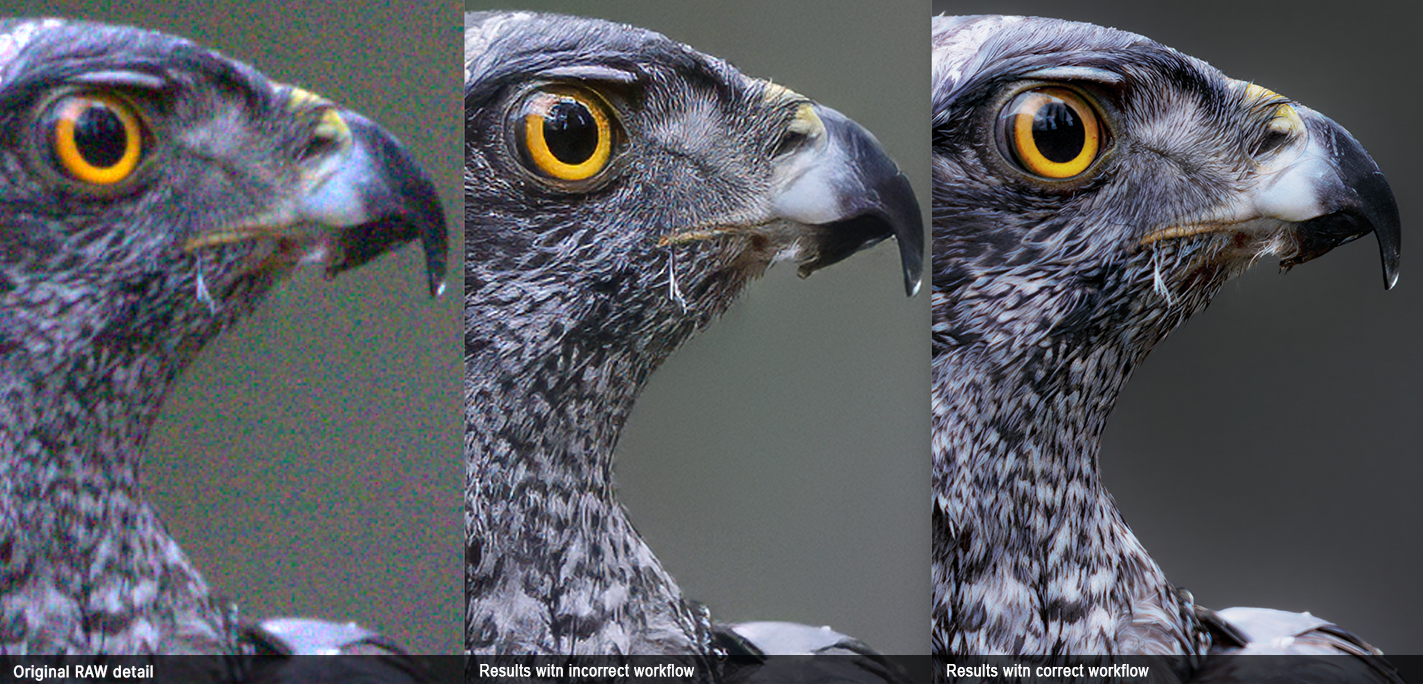
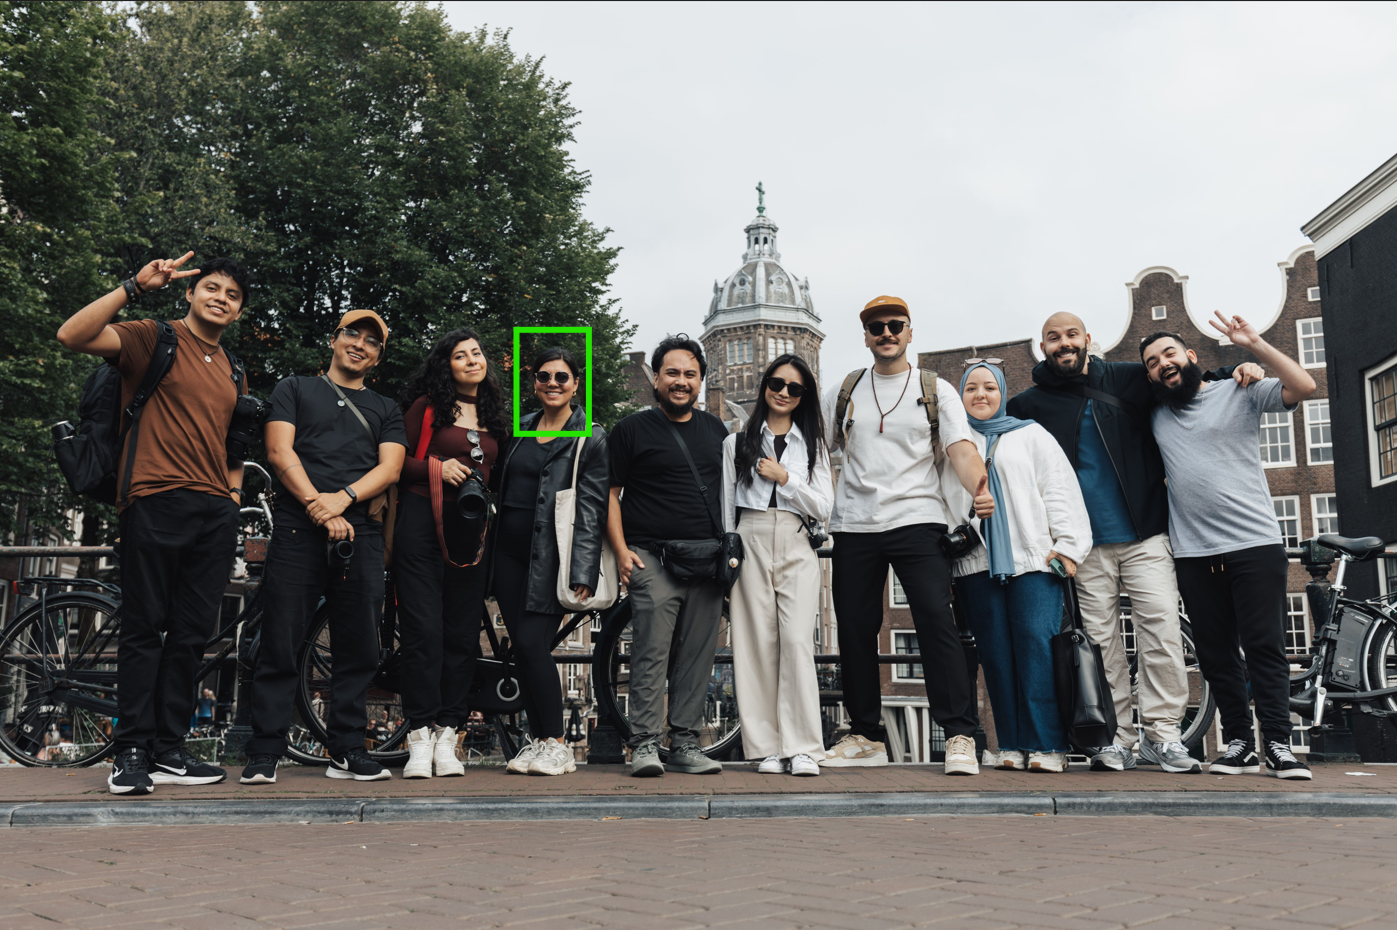
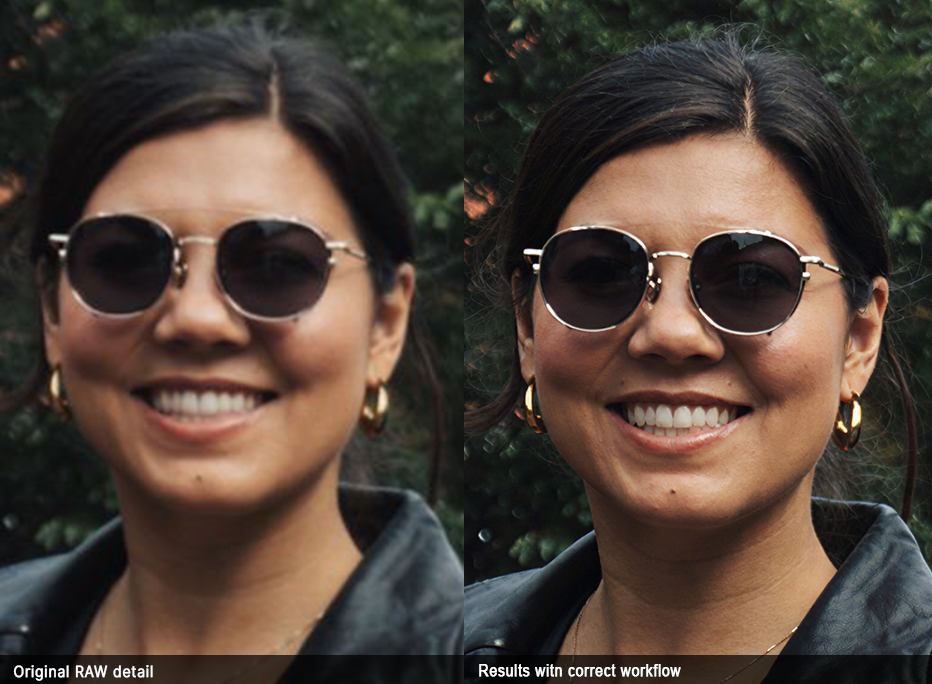
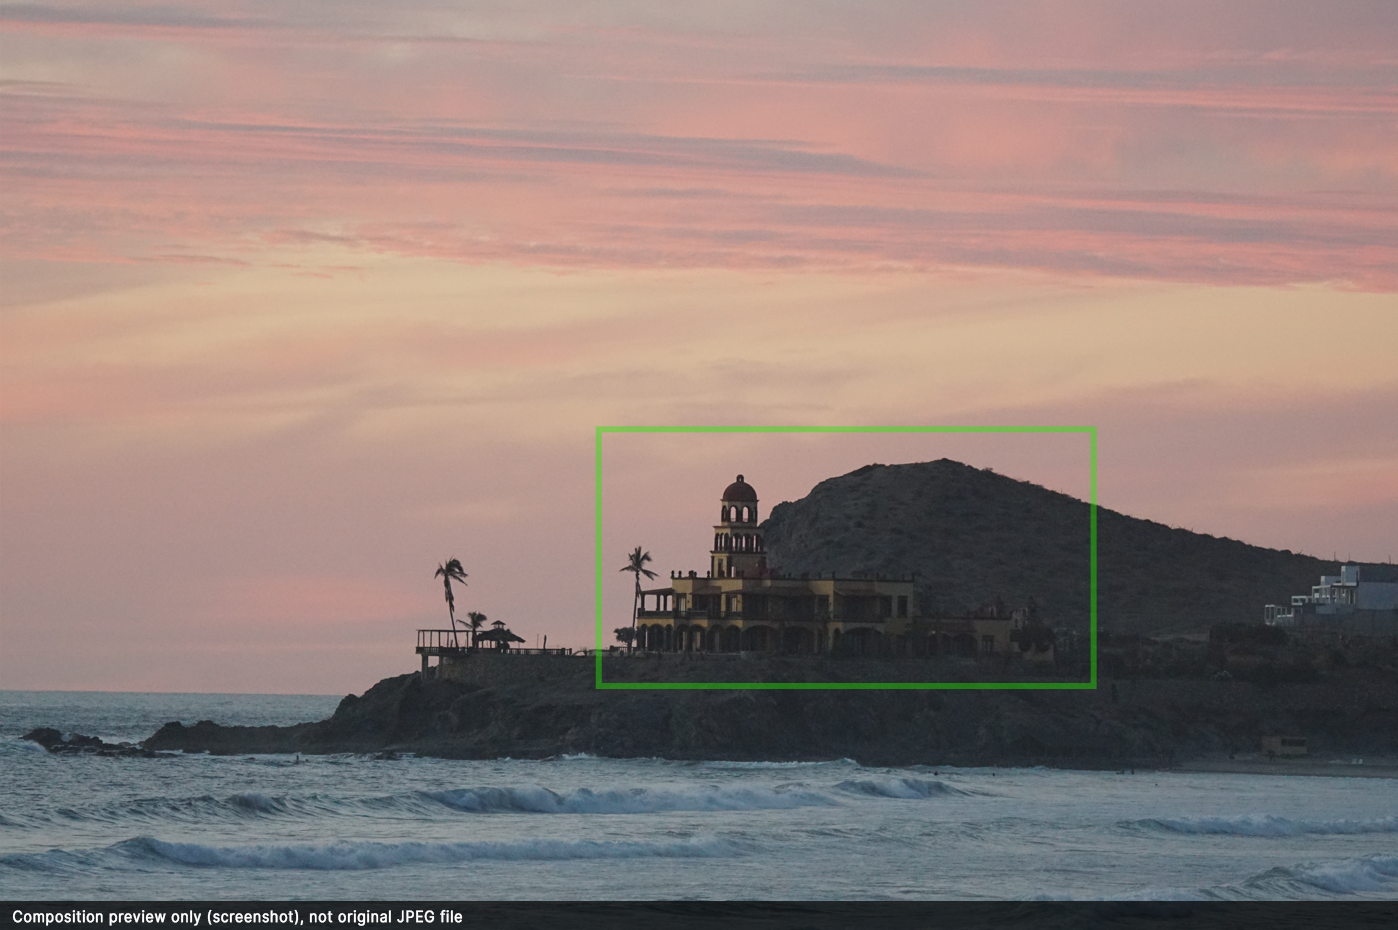
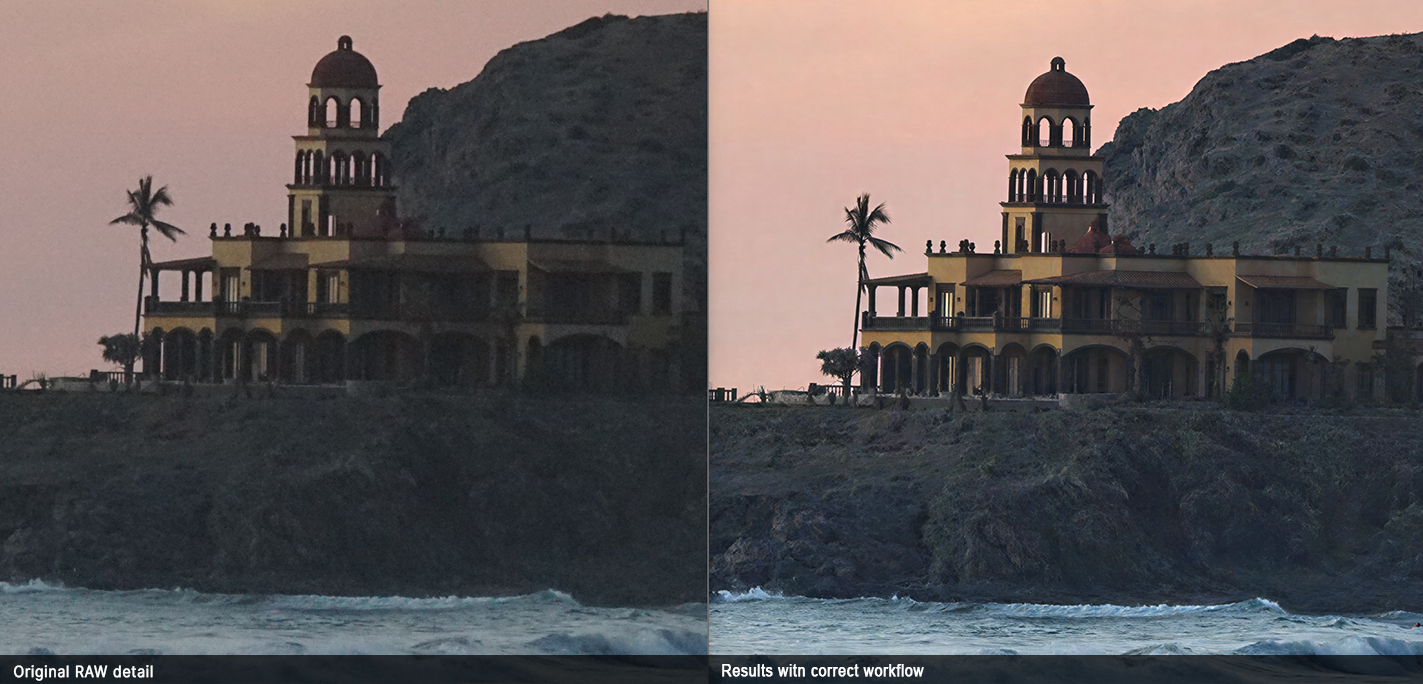
[Full-image previews are screenshots shown for composition only. Comparison results were processed in Topaz Photo using the original RAW files.]
Workflow Essentials
- Start with the best source file: Give Topaz Photo access to the original image data whenever possible. RAW and non-RAW files may require different workflows.
- Use each application at the right stage: Avoid unnecessary conversions or repeating the same processing. The order matters.
- Only correct what the image needs: The workflows are starting points, not recipes. No noise? Skip Denoise. Already sharp? Don't Sharpen. Don't need more resolution or a bigger file? Don't Upscale. The key is identifying what the image needs and only apply the correct model/s as needed, while using the correct workflow order.
- Editing one image or many? Some plugins only send images one at a time. For multiple files, standalone may be more efficient.
🧩 Step 1: Topaz Photo + Other Apps
Choose your editing application below to see the recommended RAW and non-RAW workflows with Topaz Photo.
⬇️⬇️⬇️⬇️⬇️⬇️⬇️⬇️⬇️
When using Lightroom Classic (LrC) with Topaz Photo, the recommended workflow depends on whether you're starting with an original RAW photo or a non-RAW file.
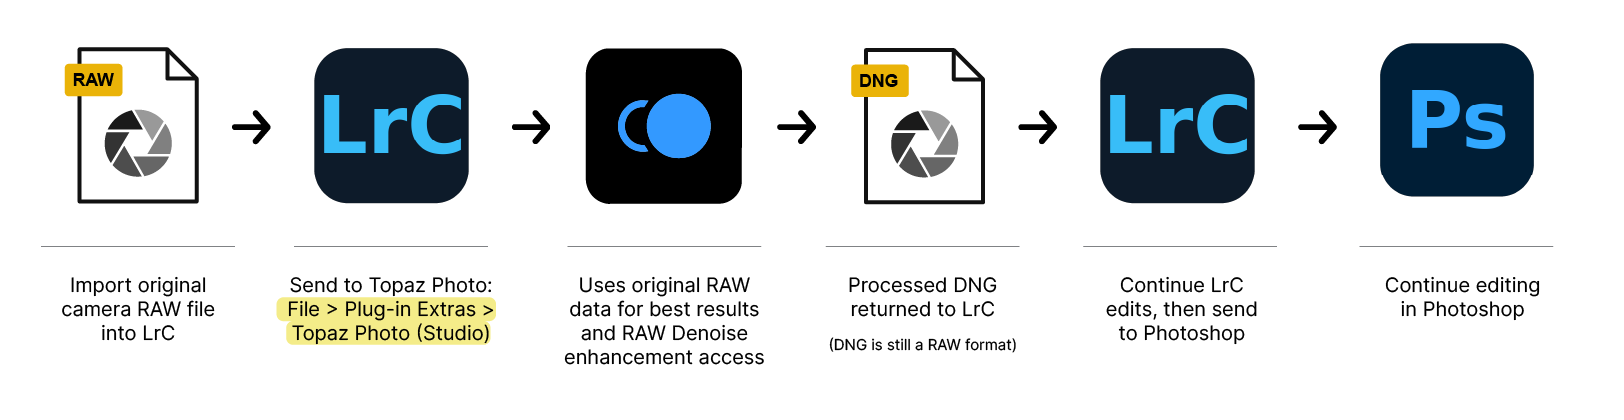
For photos shot in RAW format, use the dedicated Topaz Photo RAW plugin in LRC:
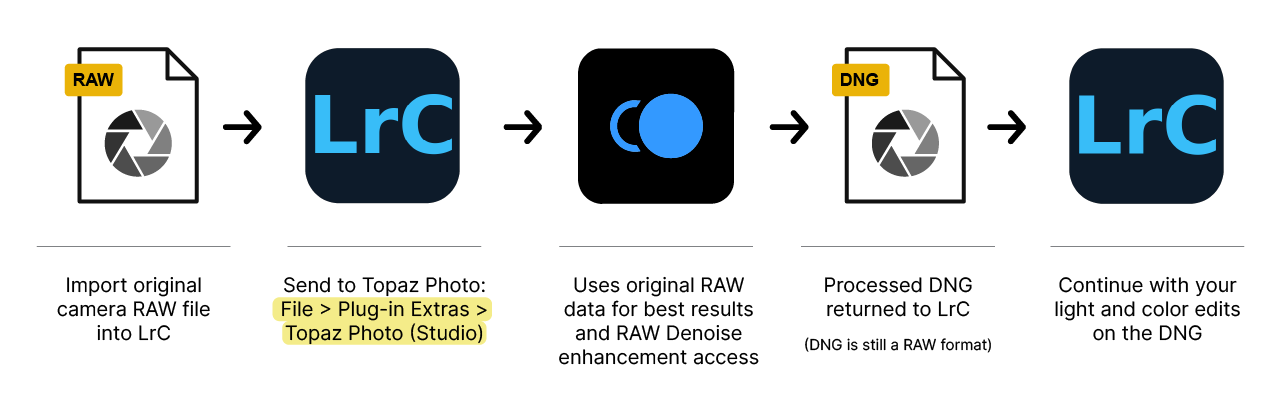
This sends the original RAW file to Topaz Photo, giving it access to the RAW sensor data for the best possible results. The processed file returns to LrC as a DNG, preserving the RAW workflow.
Using Lightroom (Lr) instead of Lightroom Classic (LrC)? The two applications use different workflows with Topaz Photo. Select the Lightroom (Lr) tab above for the correct RAW and non-RAW workflows.
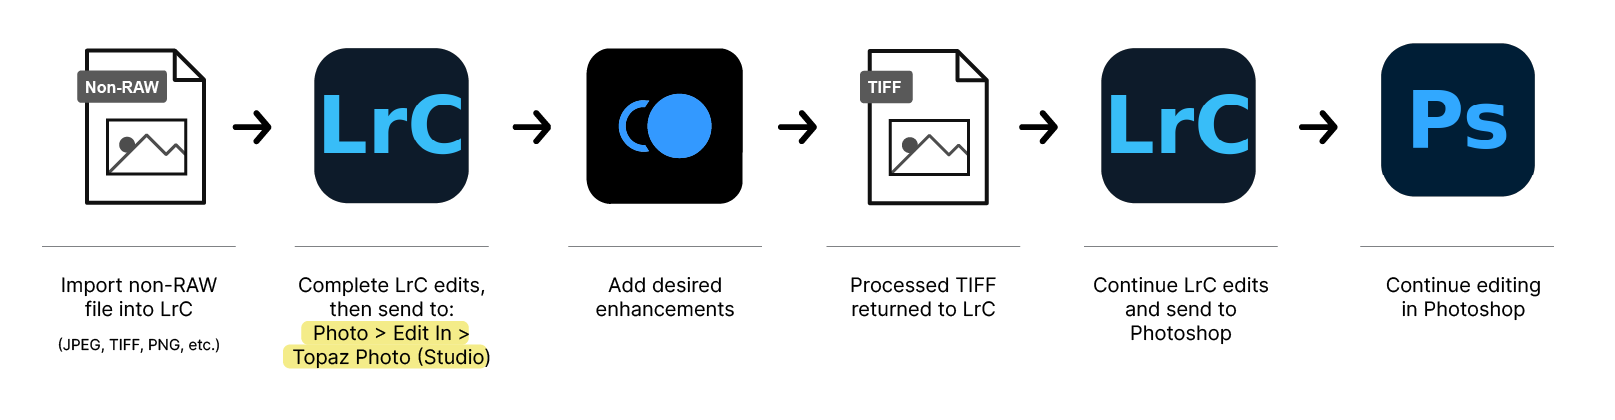
For photos shot in JPEG format or for any other files in a non-RAW format, use:
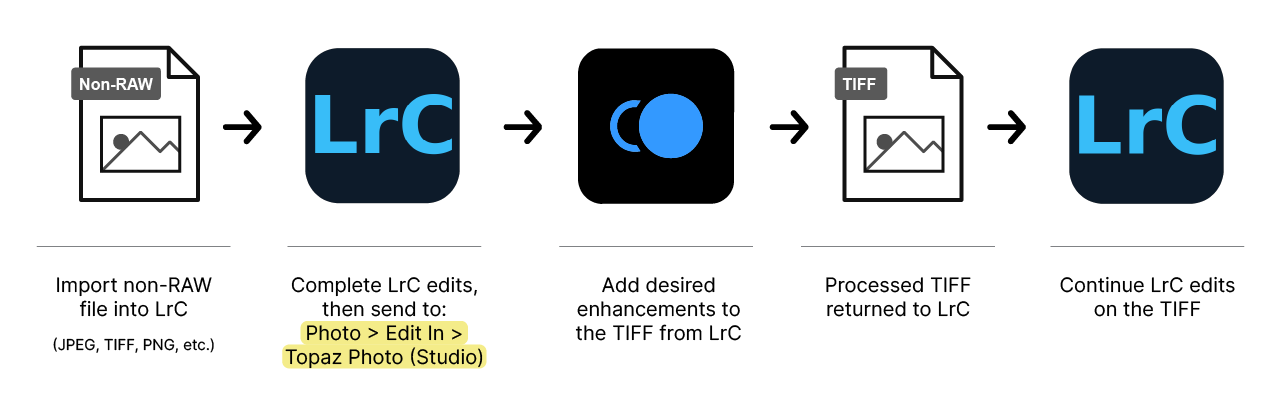
You can complete your LrC lighting, color and other creative edits before or after sending the file to Topaz Photo. Any LrC adjustments will be included in the rendered image sent through Edit In.
Lightroom (Lr) supports Topaz Photo as an external editor for non-RAW files. Unlike Lightroom Classic, Lightroom does not have a plugin path that can send the original RAW data directly to Topaz Photo.
For RAW files, open the original RAW directly in Topaz Photo instead.
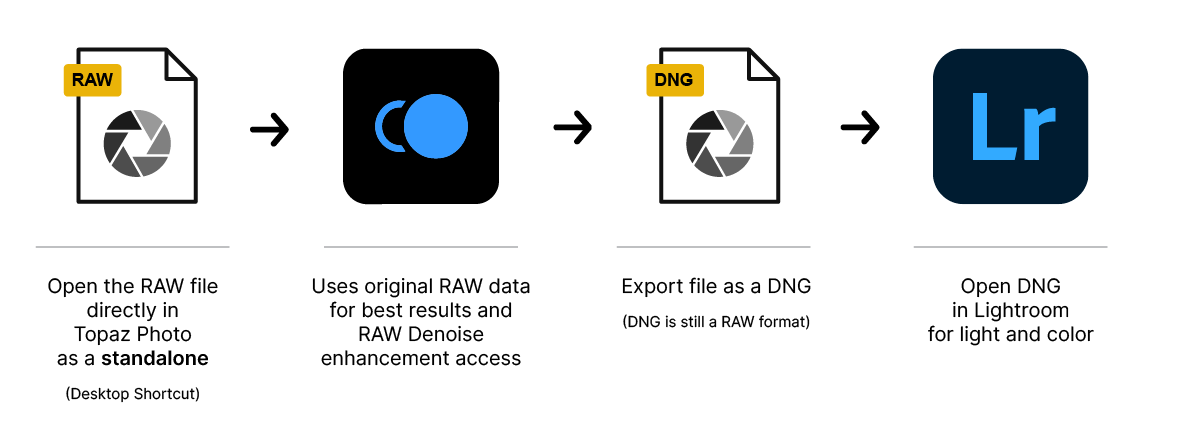
This gives Topaz Photo access to the original RAW data and RAW Denoise, while allowing you to continue your RAW light and color edits in Lightroom afterward.
For JPEG, TIFF and other non-RAW files, you can send the image from Lightroom to Topaz Photo using the external editor workflow.
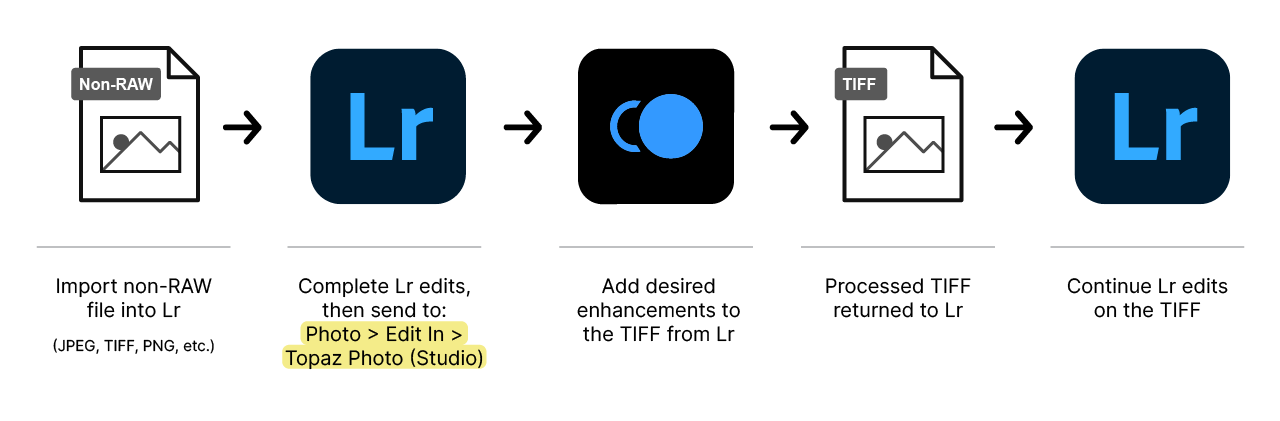
When using Photoshop (PS) with Topaz Photo, the recommended workflow depends on whether you're starting with an original RAW photo or a non-RAW file.
For photos shot in RAW, open the original RAW file directly in Topaz Photo as a standalone.
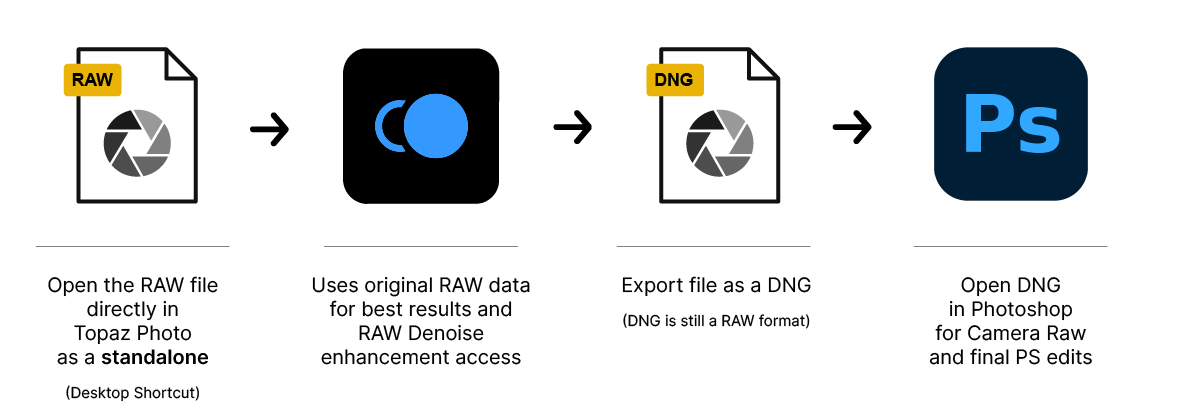
This gives Topaz Photo access to the original RAW sensor data, including RAW Denoise. Export the processed file as DNG, then open the DNG in Photoshop for Camera Raw and any final Photoshop edits.
For JPEG, TIFF, PNG and other non-RAW files, use the Topaz Photo plugin directly from Photoshop.
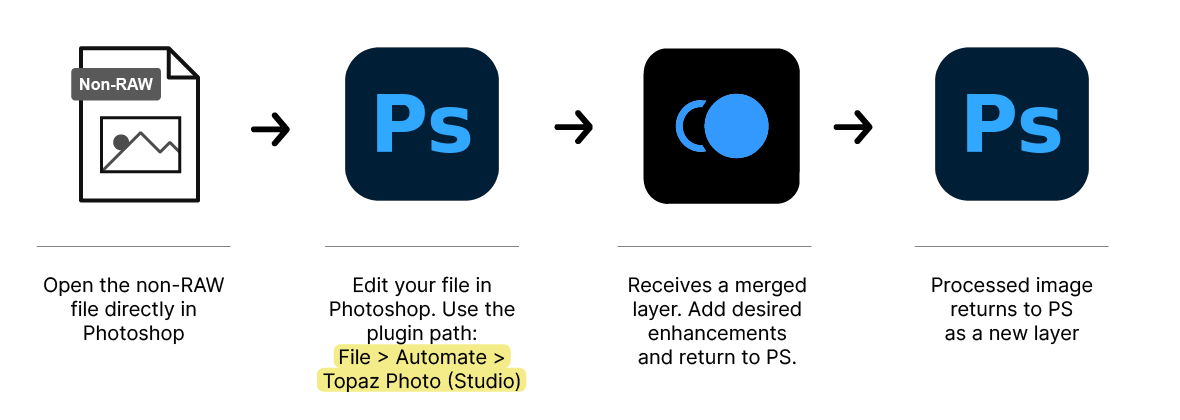
When using LrC, Photoshop and Topaz Photo together, send the image to Topaz Photo from LrC first. Once it returns to LrC, continue to Photoshop if needed.
Use the LrC RAW plugin first to give Topaz Photo access to the original RAW data. Once the processed DNG returns to LrC, continue your LrC edits and send it to Photoshop.
Complete your LrC edits, then send the image to Topaz Photo from LrC. Once the processed TIFF returns to LrC, continue your LrC edits and send it to Photoshop.
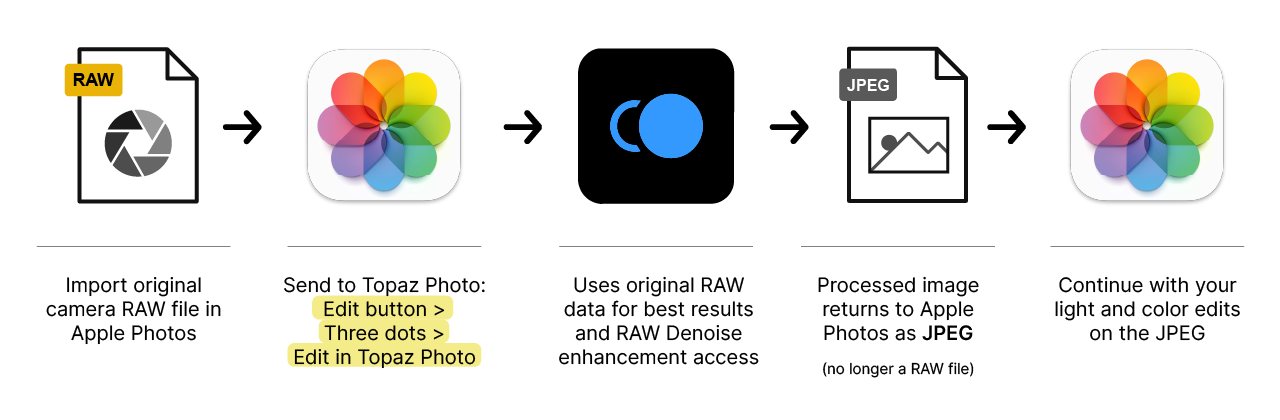
The Apple Photos plugin processes one image at a time and always returns the processed image as JPEG.
The Apple Photos plugin can send the original RAW data to Topaz Photo, giving you access to RAW Denoise. However, the processed image returns to Apple Photos as JPEG.
If you edit multiple files or are looking to keep the file as DNG, see the other section (Recommended RAW workflow below)
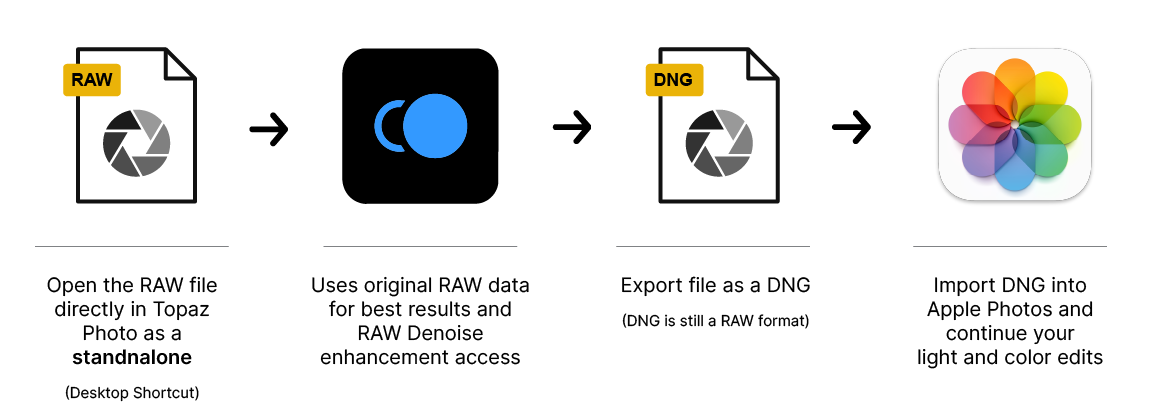
Recommended RAW Workflow
To keep the processed file in RAW format, open the original RAW directly in Topaz Photo standalone, export as DNG, then import the DNG into Apple Photos.
For non-RAW files, use the Apple Photos plugin to send the image to Topaz Photo. The processed image returns to Apple Photos as JPEG.
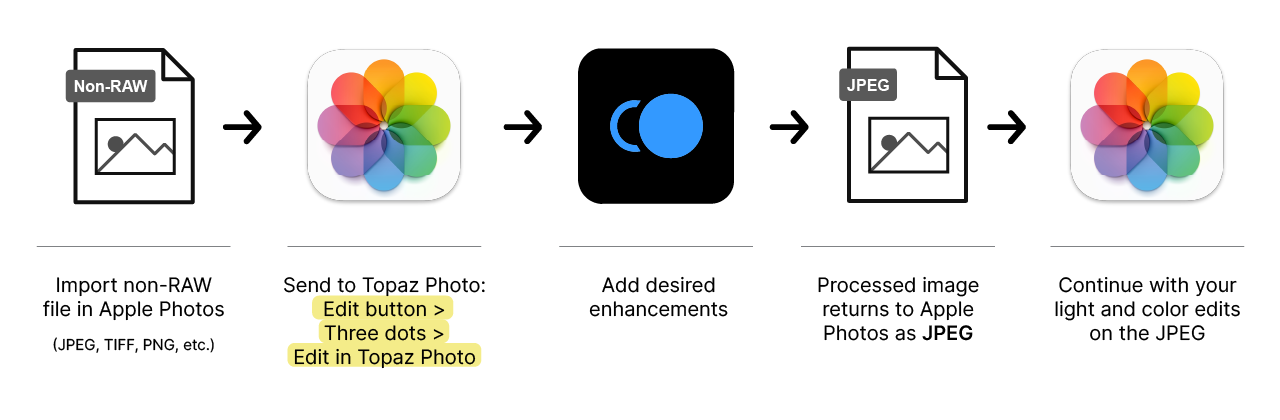
Topaz Photo can also be used with other editing applications, however, depending on the application and source file, the workflow will differ.
- Capture One has a supported Topaz Photo plugin.
- For other applications without a supported plugin, use Topaz Photo standalone and then use the exported file into the other program.
Capture One
Topaz Photo has a supported Capture One (C1) plugin workflow. The same general workflow can be used with RAW and non-RAW files.

See the Capture One Plugin Guide
Other Editing Applications
If your editing application doesn't have a supported Topaz Photo plugin, the only supported workflow is to use the standalone:
- Open Topaz Photo as standalone (desktop shortcut)
- Import files in Topaz Photo
- Export the files
- Then import the files into your other editing application.
📷 Step 2: Working With RAW
When working with a photo shot in RAW, use a workflow that gives Topaz Photo access to the original RAW data. This can be through a supported RAW plugin workflow in Step 1, or by opening the original RAW file directly in Topaz Photo.
RAW files contain more original image data and may already have sufficient resolution, so they often need minimal processing. Correct RAW noise first, then evaluate what the image still needs.
- RAW Denoise: For supported RAW files, RAW Denoise is applied automatically when applicable.
- Evaluate the result: Once RAW noise is corrected, identify what still needs improvement.
- Add only what the image needs: Choose additional enhancements based on the remaining issue.
Once RAW noise is corrected, identify what the image still needs and add only the appropriate enhancement:
- Low-light noise remains -> Add Denoise.
- Slightly soft or lightly blurred -> Add Sharpen.
- Missed focus -> Try Super Focus instead of Sharpen.
- Heavy crop or missing detail -> Use Upscale if the cropped image needs more resolution. Try a model such as Wonder when additional detail also needs to be reconstructed.
- Need a larger image for print -> Use Upscale to reach the required output size.
- Nothing else needs correction -> Stop there. A good RAW file may only need RAW Denoise before continuing your editing workflow.
- Light and color edits -> For the best RAW workflow, export from Topaz Photo as DNG and continue your light and color edits in a RAW editor such as Lightroom Classic or Capture One. If you don't use another editing program, you can use Adjust Lighting and Balance Color in Topaz Photo. Keep in mind: Using Adjust Lighting or Balance Color will convert the file to TIFF, ending the RAW workflow.
🖼️ Step 3: Workflows by Use Case
Choose a use case below to see which enhancements may be useful and in what order. Only use what your image actually needs.
⬇️⬇️⬇️⬇️⬇️⬇️⬇️⬇️⬇️
Wildlife images can have very different needs depending on noise, focus, subject size and how heavily the image will be cropped. Only use the enhancements needed for the specific image.
Use Case #1 : RAW with a Slightly Soft Subject
- RAW Denoise: Correct RAW noise first.
- Denoise: Only if additional low-light noise remains.
- Sharpen: If the subject is slightly soft.
- Crop: Determine your final composition.
- Upscale: If the final crop needs more resolution or if you want added details, can use Wonder 1x.
- Continue your editing workflow.
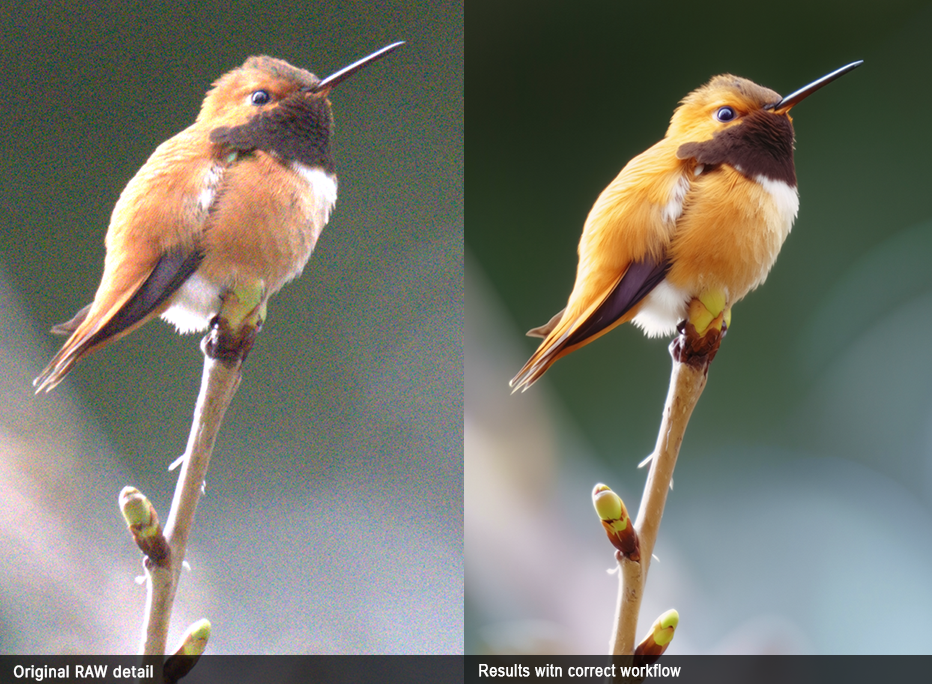
Use Case #2: Small/Distant Subject, needs a Heavy Crop
Wildlife subjects often occupy only a small part of the original frame. A heavy crop can leave the final image with much less resolution.
- Correct noise: If needed.
- Sharpen or Super Focus: Choose based on the focus problem.
- Crop: Set your final composition.
- Upscale: If additional resolution or detail is needed, test Wonder.
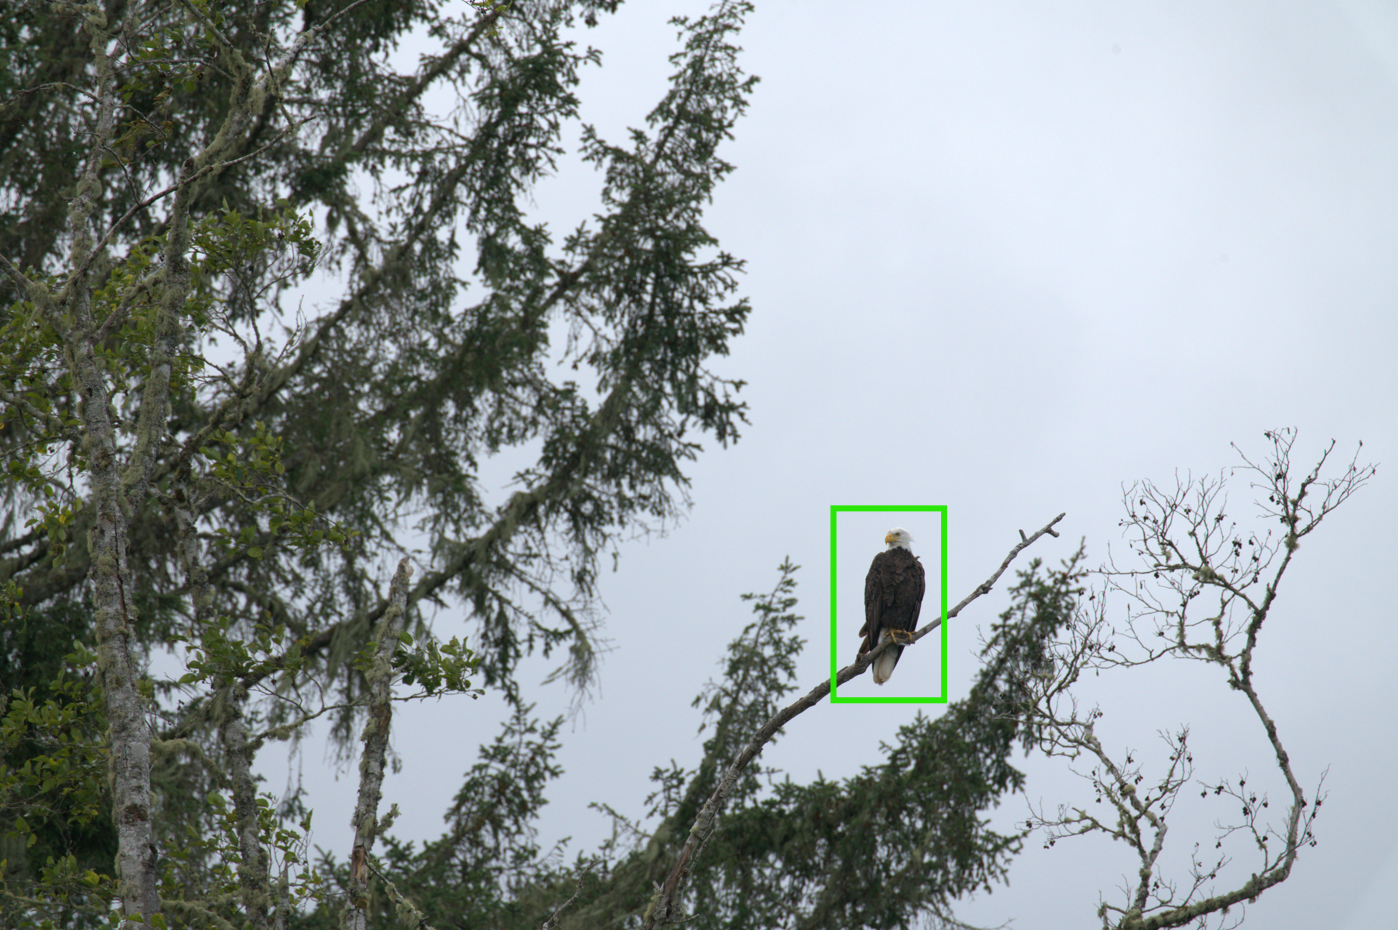
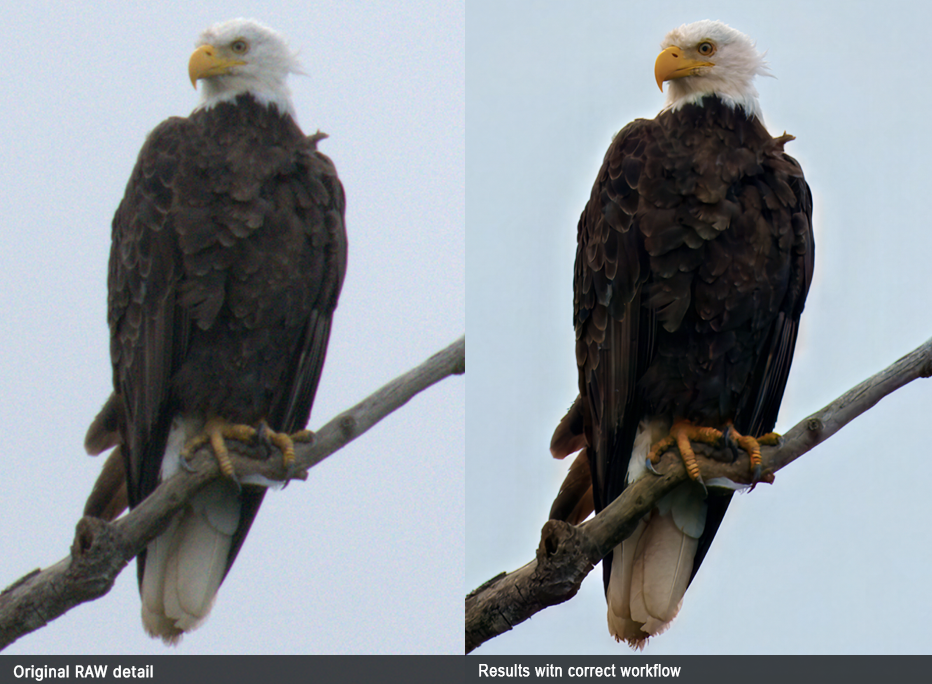
[Full-image preview is a screenshot shown to show the original composition only. Comparison results were processed in Topaz Photo using the original RAW file.]
Important Mentions
- Noise before Sharpen: Correct noise first to avoid sharpening the existing noise.
- Sharpen vs Super Focus: For a slightly soft subject, start with Sharpen. If focus was actually missed and Sharpen cannot adequately recover it, remove Sharpen and try Super Focus instead.
- To add detail: An Upscale model such as Wonder can be useful when additional detail needs to be reconstructed from a small or heavily cropped subject.
- Use Selections: Apply Sharpen or Super Focus only where needed. Avoid processing areas that are already sharp or intentionally out of focus, such as a blurred background.
Portraits can require different enhancements depending on noise, focus, facial detail and the quality of the original image. Only use the enhancements needed for the specific image.
Use Case #1: RAW Portrait Requiring Light Retouching
- RAW Denoise: Correct RAW noise first.
- Denoise: Only if additional low-light noise remains, add Denoise.
- Sharpen/Add detail: If needed, add details with Sharpen Portrait or Wonder, if the subject is slightly soft.
- Spot Healing: If needed, correct individual distractions or imperfections where needed.
- Continue your editing workflow for light and color edits.
Use Case #2: Small or Low-Resolution Face
When a face occupies only a small part of the image or the source file has limited resolution, normal Sharpen may not have enough original detail to work with.
- Correct noise: If needed. Keep in mind that compression, low resolution, and grain are not noise. Only use denoise if digital noise is present. In doubt, do not use it and contact support for best enhancement to use.
- Upscale the image: If there are compression and low resolution issues on the file, use an upscaling model like Wonder to address this.
- Recover Faces: Once Wonder applied, check if Recover Faces is needed at all.
- Continue your editing workflow for light and color edits.
Important Mentions
- Don't overprocess a good portrait: A clean, high-resolution portrait may need very little processing. Only add enhancements that correct an actual problem. The Sharpen Portrait model can be useful for those cases to add some details.
- Recover Faces: Use when facial information needs recovery, not automatically on every portrait or face.
- Use Selections: Target enhancements only where they're needed rather than processing the entire image.
Landscape images often contain fine detail across a large part of the frame, so avoid processing areas that are already clean and sharp.
Use Case #1: Landscape Requiring Noise and Detail Correction
- RAW Denoise and/or Denoise: Correct noise first.
- Sharpen: If the image needs additional sharpness.
- Crop: Set your final composition.
- Upscale: If additional resolution is needed for the final output.
- Continue your light and color editing workflow.
Use Case #2: Landscape Requiring a Large Print
- Correct noise: If needed.
- Sharpen: If needed.
- Crop: Set the final composition.
- Upscale: Set the resolution needed for the final output.
- Continue your editing workflow.
Important Mentions
- Don't sharpen everything automatically: Landscapes can contain areas that should remain naturally soft, such as distant atmosphere, water or out-of-focus areas. Use Sharpen only if needed, at low strength and opacity.
- Use Selections: Target Sharpen where additional detail is actually needed. To avoid an over-processed look, you can test Sharpen on All, at low strength and opacity vs using Selections, and see what works best for your file.
- Lighting and color: If another editing application handles your lighting and color work, there is no need to duplicate those adjustments in Topaz Photo.
Low-light images can contain significant noise, making it especially important to correct noise before adding Sharpen or other detail enhancements.
Use Case #1: High-ISO RAW Low-Light Photo
- RAW Denoise: Correct RAW noise first.
- Evaluate the result: Check whether additional noise remains.
- Denoise: Only if additional low-light noise still needs correction.
- Sharpen: If needed after correcting the noise.
- Continue your editing workflow.
Use Case #2: Noisy Non-RAW or X-Trans Image
- Denoise: Correct the noise present in the image.
- Evaluate the result: Determine whether additional correction is needed.
- Sharpen: If the cleaned image is also soft.
- Continue your editing workflow.
Important Mentions
- Start from RAW when available: If the photo was shot RAW, use a workflow that gives Topaz Photo access to the original RAW data.
- Don't automatically stack Denoise models: Apply RAW Denoise first, evaluate the result, then add Denoise only if another noise problem remains.
- Noise before Sharpen: Correct noise first so that Sharpen doesn't enhance the existing noise.
Old and scanned photos can contain a combination of dust, scratches, damage, noise, softness and limited resolution. Correct the problems present rather than applying every restoration enhancement automatically.
Use Case #1: Old or Scanned Photo with Widespread Damage
- Dust & Scratch: Correct widespread dust and scratch damage.
- Spot Healing: Clean up individual areas that remain.
- Denoise: If actual noise is present.
- Sharpen: If the image is soft.
- Recover Faces: If facial information needs recovery.
- Upscale: If additional resolution is needed.
Use Case #2: Small Old Photo Requiring More Resolution
- Correct damage: If needed.
- Denoise or Sharpen: Only if the image needs it.
- Recover Faces: If facial information needs recovery.
- Upscale: Increase resolution and reconstruct detail where needed.
An Upscale model such as Wonder may be useful when the original contains very limited detail and additional reconstruction is needed.
Important Mentions
- Dust & Scratch vs Spot Healing: Use Dust & Scratch for widespread damage and Spot Healing for individual areas that still need correction.
- Grain isn't digital noise: Denoise may reduce grain, but can also introduce unwanted details or artifacts. Don't automatically use Denoise simply because an old photo has visible grain.
- Recover Faces: Use only when facial information is actually needed.
- Don't remove character unnecessarily: Texture and grain can be part of the original photograph. Restoration doesn't always mean removing everything. If needed, use Grain at the end of your workflow to reintroduce some natural texture.
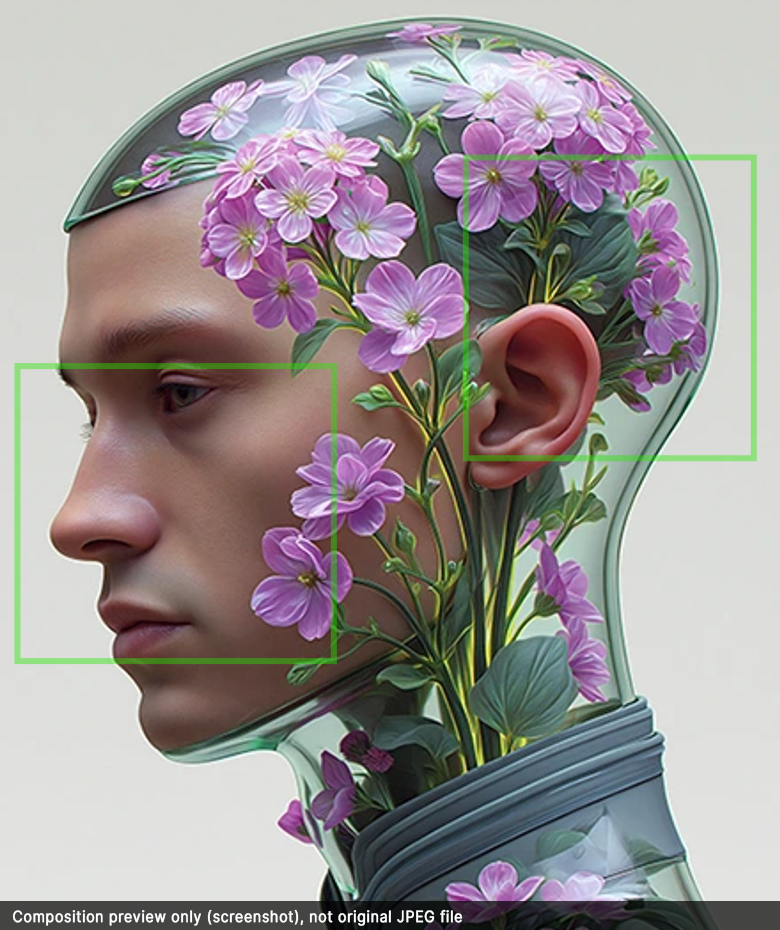
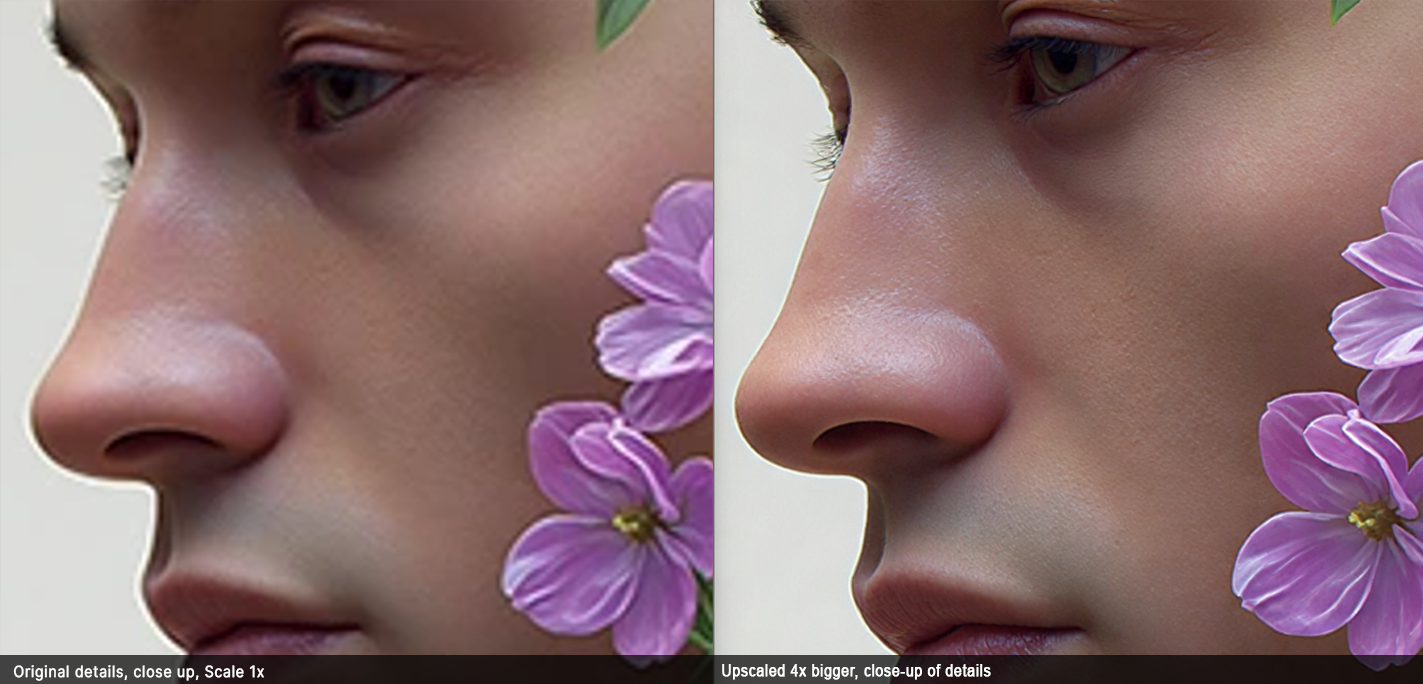
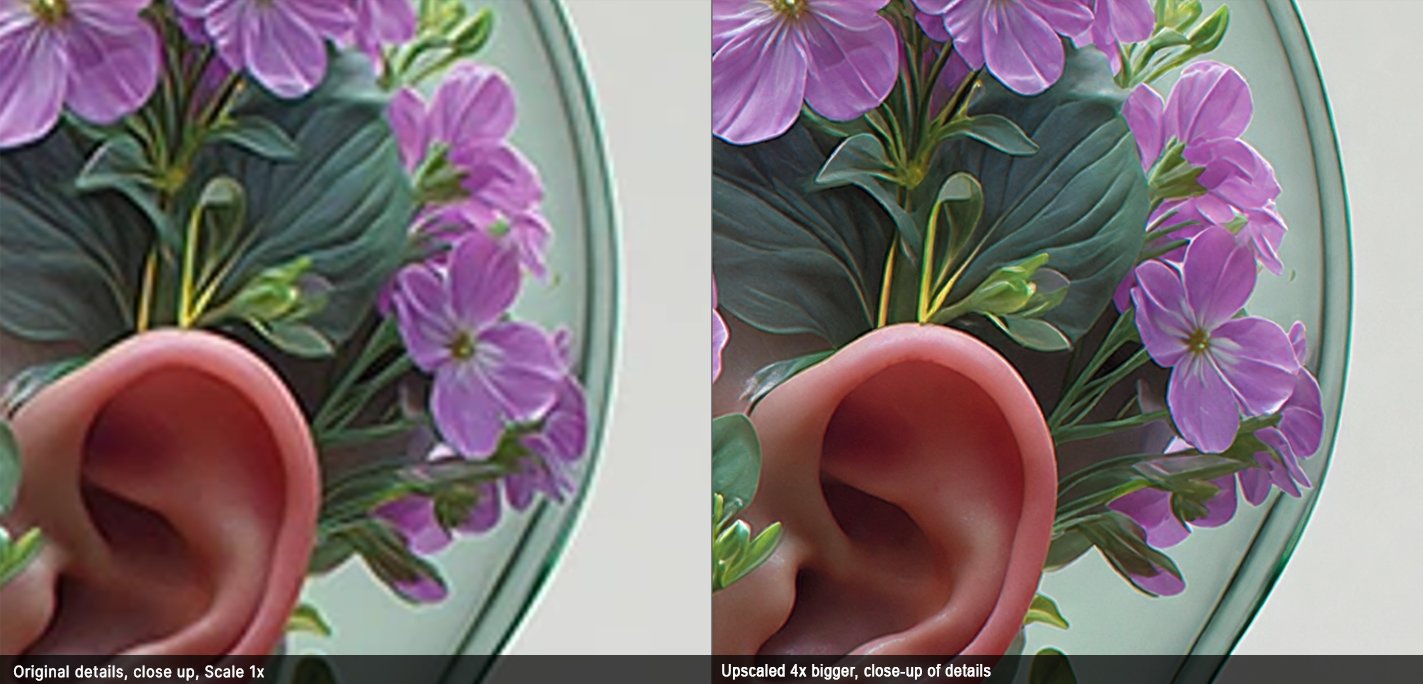
AI-generated images are often small or limited in resolution, even when they already contain good detail. In many cases, Upscale is more useful than automatically adding Denoise or Sharpen.
Use Case #1: Low-Resolution AI-Generated Image
- Evaluate the source: Check whether the main problem is simply low resolution.
- Upscale with Wonder: Use a generative Upscale model when additional detail needs to be reconstructed, such as Wonder.
- Review the result: Check reconstructed details before increasing the image further.
- Export: If the required final resolution has been reached.
Use Case #2: AI Image Requiring a Very Large Upscale
For very large outputs, you don't necessarily need to perform the entire upscale with a generative model.
- Wonder at 1x: Reconstruct and improve detail without performing a large generative upscale.
- Export the processed image.
- Reopen the result in Topaz Photo.
- Upscale to needed size: Use a non-generative Upscale model to reach the larger final dimensions, such as Standard.
This can be more efficient because non-generative models process faster and can handle the larger size increase after Wonder has reconstructed the detail.
Important Mentions
- Low resolution isn't noise: AI generated images will not have digital noise and do not need a denoise model.
- Don't overprocess: If the image is already clean and sharp, a non-generative Upscale may be the only enhancement needed. Only use a generative model (Wonder) if generating detail is needed.
- Generative models reconstruct detail: Review the result carefully when accuracy to the original content is important.
For other images, identify the main problem you're trying to correct or the final result you need.
🌌 Astrophotography
Correct noise first. Denoise Max can work especially well for difficult astrophotography noise. Add Sharpen afterward only if needed.
🖨️ Large Prints
Determine the final dimensions and resolution needed first, then Upscale accordingly. A good-quality source may only need a non-generative Upscale model.
🔍 Low-Resolution, Small or Compressed Images
Low resolution and compression are not digital noise. Use Upscale for more resolution, or Wonder when missing detail needs to be reconstructed.
🔬 Macro Photography
Use Selections to target Sharpen or other enhancements only where needed. Avoid processing areas that are naturally soft or out of focus.
🎯 Soft or Missed Focus
Use Sharpen for slight softness. If focus was actually missed, remove Sharpen and try Super Focus instead.
🏃 Sports & Action
Correct noise first, then use Sharpen for softness or Super Focus for missed focus. Heavily cropped subjects may also benefit from Upscale.
🤿 Underwater Photography
Correct noise first, then use Sharpen if needed. Adjust Lighting and Balance Color can help with underwater lighting and color.
❓Frequently Asked Questions
Q: Should I use Topaz Photo as a plugin or standalone?
A: It depends on your source file and editing applications. For RAW files, prioritize a workflow that gives Topaz Photo access to the original RAW data. For multiple files, standalone may be more efficient when your plugin only supports one image at a time.
See 'Step 1:Editing Workflows' above
Q: What is the recommended order of enhancements?
The recommended order depends on your source file:
- RAW files: RAW Denoise → Denoise (if additional low-light noise remains) → Sharpen or Super Focus → Remove → Adjust Lighting → Balance Color → Recover Faces → Preserve Text → Upscale
- Non-RAW files: Dust & Scratch → Denoise → Sharpen or Super Focus → Remove → Adjust Lighting → Balance Color → Recover Faces → Preserve Text → Upscale
You do not need every enhancement. Only use those needed for your image, in the recommended order above.
- Noise before Sharpen: Correct noise first to avoid sharpening the noise.
- Make sure it's actually noise: Low resolution, compression artifacts and grain are not digital noise. Denoise may reduce grain but can also introduce unwanted details or artifacts. For low-resolution or compressed images, use Upscale models such as Wonder rather than Denoise to address missing detail and compression artifacts.
Q: Why isn't RAW Denoise available for my RAW file?
A: If RAW Denoise is not applied when your RAW file is opened in Topaz Photo, there are two things to check:
- The image may not be reaching Topaz Photo as a RAW file. Some plugin workflows convert RAW files to TIFF or another non-RAW format before sending them to Topaz Photo. See Step 1: Topaz Photo + Other Apps to make sure you're using the correct RAW workflow.
- Your camera may use an X-Trans sensor. RAW Denoise is designed for supported RAW files from Bayer sensor cameras. X-Trans sensor cameras, found in many Fujifilm models, do not have the same type of RAW sensor noise, so RAW Denoise will not apply. If noise is present on an X-Trans RAW file, use Denoise instead. For more difficult low-light or high-ISO noise, Denoise Max can give great results.
Q: When should I Crop in my workflow?
A: In Topaz Photo, Crop is committed when you export or return the file to your plugin host. Until then, the enhancements process the full image, including areas outside the crop.
For a heavy crop before using a generative model, a more efficient workflow is:
- Apply RAW Denoise (when working with a file shot in RAW).
- Crop and apply any needed non-generative enhancements.
- Export or return the file to commit the crop. Use 16-bit TIFF when applicable.
- Reopen the cropped file in Topaz Photo using a non-RAW workflow.
- Apply any needed generative models.
This lets generative models process only the cropped image, reducing unnecessary processing time.
Q: I'm getting unwanted or overprocessed results. What should I check first?
A: Start with your workflow and original file. Unwanted results aren't always caused by the enhancement or model itself.
- Is Topaz Photo receiving the best available source file? If you shot RAW, use a workflow that gives Topaz Photo access to the original RAW data whenever possible.
- Has the image gone through unnecessary exports, conversions or compression?
- Was it already processed with Denoise, Sharpen, AI enhancement or restoration in another application?
- Are you applying enhancements the image doesn't need, or using settings that are too strong?
🔗 Related Docs
- Supported Plugins: Supported editing applications and plugin workflows.
- Enhancements: What each enhancement does and when to use it.
- Batch Processing: Process multiple images efficiently.
- Selections Guide: Apply enhancements only where they're needed.
💬Contact Support
Still unsure which workflow to use or getting unwanted results? Send an email to our Support team with this information:
- Your exact workflow: Applications and all steps used.
Example: LrC → File menu → Plug-in Extras → Proocess with Topaz Photo - The original file: Send the true original, untouched file. For RAW, send the original camera RAW, not an exported or converted version.
- What you're trying to do with the file: Fix noise, missed focus, softness, low resolution, compression, face detail, etc. For large prints, include the final size and resolution needed.
- Your current result: Send the exported result or an in-app screenshot, along with a screenshot showing the enhancements, models and settings used.
- Logs (technical issues only): For crashes, errors or plugin/app issues, go to Topaz Photo → Help → Open Logs Folder and attach all the files present in this folder to your Support email. Logs aren't needed for unwanted results or workflow help.
The original file + current result + exact workflow are the most important pieces for us to reproduce what you're seeing and recommend the right steps.
➡️ Send everything to support@topazlabs.com.